Analytics: Google Analytics, Tag Manager, Facebook Pixel
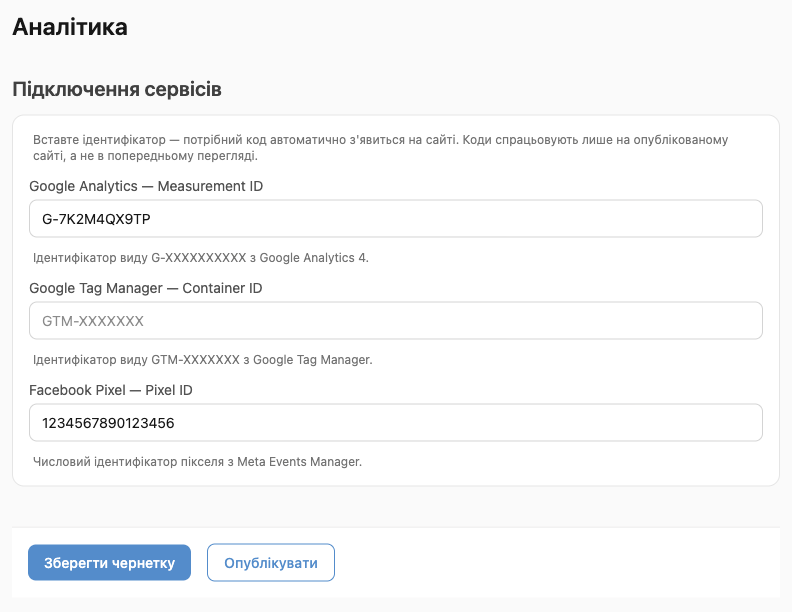
Connect Google Analytics 4, Google Tag Manager, or Facebook Pixel to your store without a developer or pasting code. Just enter the ID on the “Analytics” tab of the site editor, and the right code appears on every page of your published store automatically.
What you can connect
| Service | What to enter | What it's for |
|---|---|---|
| Google Analytics 4 | A Measurement ID like G-XXXXXXXXXX | Traffic, traffic sources, popular pages. |
| Google Tag Manager | A Container ID like GTM-XXXXXXX | Manage any tags (Google Ads, TikTok, Hotjar, and more) from a single GTM account. |
| Facebook Pixel | A Pixel ID, digits only, for example 123456789012345 | Audiences and retargeting for Facebook and Instagram ads. |
You can connect one service, several, or all three at once.
How to connect
- Open the site editor (Edit website on the store card) → Analytics.
- Paste the ID into the right field. Leading and trailing spaces are removed automatically.
- Click Publish (or Save draft first if you want to publish later along with other changes).
⚠️ Paste only the ID, not the whole script code. The store adds the correct code for each service itself.
To disconnect a service, clear the field and publish.
Where to find the IDs
Google Analytics 4: Measurement ID
- In Google Analytics, open Admin → Data streams.
- Create a Web stream with your store address, or open an existing one.
- Copy the Measurement ID. It starts with
G-.
Google Tag Manager: Container ID
In Google Tag Manager, create a container of the Web type. The ID, like GTM-XXXXXXX, is shown at the top of the workspace next to the container name.
Facebook Pixel: Pixel ID
In Meta Events Manager, open Data sources and select a pixel (or create a new one). The numeric ID is shown under the pixel name.
How to check that it works
- Google Analytics: open your store in another tab, and in Analytics go to Reports → Realtime. Your visit appears within a minute.
- Google Tag Manager: click Preview in GTM and enter your store address.
- Facebook Pixel: in Events Manager, open Test events, or install the Meta Pixel Helper extension for Chrome.
💡 The codes only work on the published site. They don't run in the editor preview, or while the store is unpublished or suspended, so your own checks don't end up in your stats.
What's collected
- Google Analytics 4: page views, traffic sources, devices, locations. GA4 tracks navigation between store pages automatically (the “Enhanced measurement” setting in the data stream must be on, which it is by default).
- Facebook Pixel: a
PageViewevent on every page the visitor opens, including when they navigate between store pages. - Google Tag Manager: whatever you set up in the container yourself.
E-commerce events
The store sends purchase funnel events to all connected services on its own:
| When | Facebook Pixel | Google Analytics 4 and GTM |
|---|---|---|
| A customer opens a product page | ViewContent | view_item |
| Adds a product to the cart | AddToCart | add_to_cart |
| Proceeds to checkout | InitiateCheckout | begin_checkout |
| The order is created | Purchase | purchase |
The purchase event is sent only when an order has actually been created: on the “Thank you for your order” page, or, for card payments, after the bank confirms the payment. Clicking the “Place order” button without an order being created doesn't count as a purchase. The event is sent once per order, with the order number and total.
In Google Tag Manager, events arrive in the dataLayer in the standard GA4 e-commerce format. Create a tag with a “Custom Event” trigger, for example purchase. Don't set up purchases on a button click: that would also count orders that were never placed.
Meta Conversions API
Ad blockers and iOS privacy settings keep the pixel from firing for some customers. The Conversions API solves this: the store's server sends the Purchase event to Meta itself right after the order is created. Along with it, it sends the customer's hashed phone number, first name, and last name, so Meta can match the purchase to your ads more accurately. The browser event and the server event carry the same order number, so Meta counts the purchase once.
- In Meta Events Manager, open your pixel → Settings → the Conversions API section → Generate access token, and copy the token.
- On the “Analytics” tab of the site editor, paste it into the Conversions API access token field. The Pixel ID field must be filled in too.
- Click Publish.
Once saved, the token isn't shown in the editor, only a note that it's saved. To replace the token, paste a new one. To turn off the Conversions API, click “Remove token” and publish.
How to check. In Events Manager, open Test events and copy the test code. Paste it into the Test event code field, publish, and place a test order. The Purchase event should appear from two sources, browser and server, marked as deduplicated.
💡 After testing, clear the “Test event code” field and publish again. While the code is filled in, server purchases go only to “Test events” and don't count as real ones.
FAQ
Can I add my own script (a chat, a widget)?
Not directly. But you can add almost any third-party code through Google Tag Manager: create a “Custom HTML” tag in GTM and publish the container.
Do I need to connect GA4 if I already have GTM?
No. If Google Analytics is set up inside your GTM container, leave the Measurement ID field empty, or page views will be counted twice.
Is traffic counted in a private store?
Yes, once the visitor enters with a code. The entry screen doesn't run analytics codes. Learn more in Private store: access codes.