
Warehouse storage locations in HugeProfit: racks, shelves, and tags
While your warehouse is a single room, you remember where everything is. Once you have a dozen racks and several employees, "somewhere on the top shelf" stops working. Storage locations turn your warehouse into an addressable system: every shelf has a name, a barcode tag, and an exact list of what's on it.
What you get
- A new employee can pick orders: the sale shows which shelf each product is on.
- Stocktaking one shelf at a time: no need to shut down the whole warehouse.
- You can see what's in a specific box: open the location and see the list right away.
- Moves are recorded: move something from one shelf to another, and the history shows it.
How locations are structured
Locations form a tree inside a warehouse, with as many levels as you need:
- Room A
- Rack A1 → Shelf A1-01 → Bin A1-01-1
- Rack A2 → Shelf A2-01
- Room B (cold storage) → Row 1
There's no minimum depth: one room with five shelves can simply be five top-level locations. Each location has a name ("Rack 3") and an optional Level, a label for convenience ("Room", "Rack", "Shelf"). Everywhere in HugeProfit, you see the full path, for example "Room A / Rack A1 / Shelf A1-01", so it's clear where to look even if you have five shelves named "1".
Step 1. Build the tree
- Settings → Products → Storage locations shows a list of your warehouses.
- Next to the warehouse you need, click Add location: Name, Level, Parent location.
- In a location row: ⊕ Add nested location; ✎ to rename it or change its level or parent; 🖨 for its tag; 🗑 to delete it.
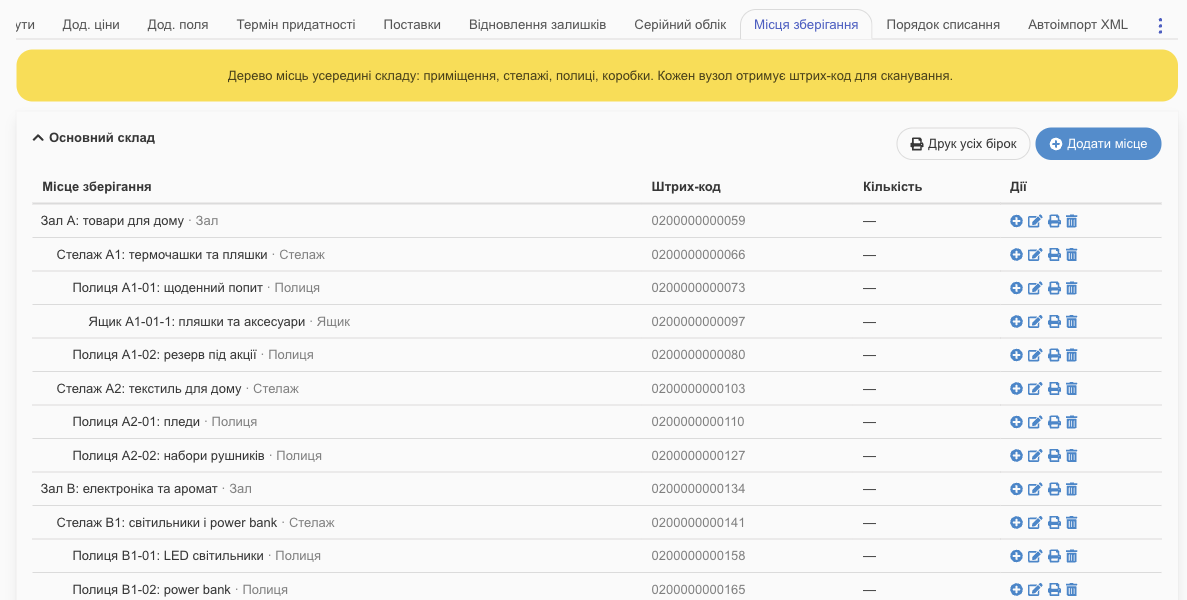
- To move a whole branch, change the location's parent: it moves along with its contents and nested locations, and the paths update automatically. You can't move a location inside itself.
- Deleting isn't always possible; this protects you from losing data: Delete the nested locations first or Move the goods out of this location first.
Step 2. Print the tags
Every location gets a barcode automatically. Stick the tag on the shelf and work with a scanner.
- One tag: 🖨 in the location row.
- All of a warehouse's tags: Print all labels next to the warehouse name (the window shows how many tags will be printed).
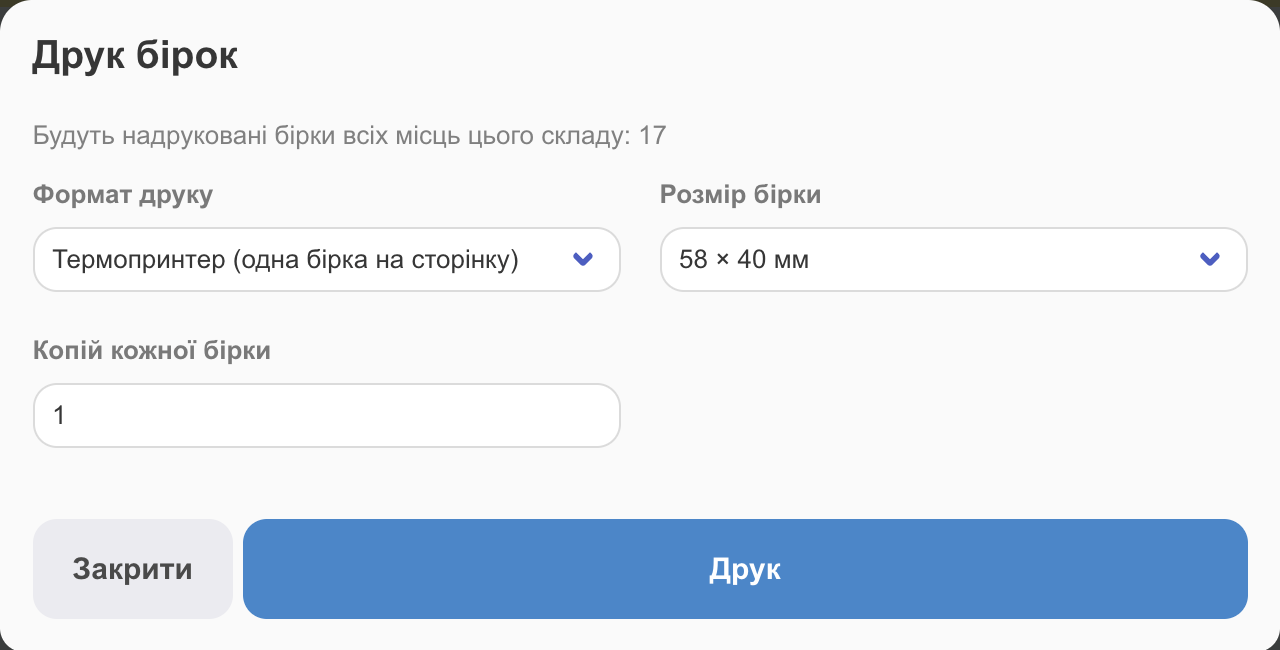
- Print format: Label printer (one label per page) or A4 sheet (grid of labels).
- Label size: 58×40, 58×30, 40×30, 30×20, 100×50, 70×37 mm, or Custom size.
- Copies of each label; for A4, Draw label border.
A tag shows only the location name and the barcode, so the code stays readable even on a small 30×20 sticker. Your print settings are remembered.
Step 3. Put products in locations
You set the location in the stock details, the same window that holds serial numbers and batches:
- Manually: each unit has its own location picker with the warehouse tree.
- Put everything in one location assigns one location to all rows at once (a box of identical goods arrived, and it all goes on one shelf).
- With a scanner: scan a location tag while the details window is open, and the location is set for all units. HugeProfit tells a location tag apart from a product barcode and ignores tags from other warehouses.
When you receive a shipment, you can choose or scan the location right away; for a shipment already received, use Assign to locations in its card.
What's in a location
In the location list, you can open the Products in this location panel to see what's on the shelf and how much (or Nothing is stored in this location). The same window opens if you scan a location tag anywhere in HugeProfit, with a scanner on your computer or with the camera in the mobile app. The product list has a Storage location filter.
Picking an order: where the product is
When you add a product that's assigned to locations to a sale, HugeProfit opens a unit selection window: each row shows the location (the full path, for example "Warehouse → Rack 3 → Shelf 2"), the serial number, and the quantity. Choose exactly which unit you're handing over; it will be taken off stock from that location.
- The selected unit and its location are shown in the sale, both in the sale card and in the sales list row. A stock clerk opens the sale and sees which shelf to pick from.
- Products not assigned to locations are added as usual, with no extra window.
- Returning or deleting a sale puts the product back in the same location.
💡 Printed sale documents (delivery note, receipt) don't include the storage location yet, so it's easier for a stock clerk to pick from the sale screen.
Internal move: from shelf to shelf
A regular stock move transfers goods between warehouses and changes their stock. An internal move relocates goods within one warehouse: Stock on hand stays the same — the goods only move to another storage location.
- Products → Moving → Internal relocation.
- Warehouse\Shop, From (storage location), and To (storage location) → Next.
- HugeProfit shows what's actually in the source location (including nested locations). Check the products, enter the quantities, and confirm.
- A unit with a serial number can only move as a whole; a batch without a serial number can be split freely (10 on the shelf, move 4, and you get 6 and 4).
- You can't choose the same location for "From" and "To".
- The stock moves list shows a document with the "Completed" status and an amount of 0: this kind of move doesn't move money, and the document shows the route between locations. The product history gets a location change entry.
- You can cancel an internal move, and the product goes back to the location it came from.
If a warehouse has storage locations, the Moving section is useful even with a single warehouse, precisely for these relocations.
Moves between warehouses: straight to the shelf
If the receiving warehouse has locations, a regular stock move shows a Location at destination warehouse field, so the goods arrive directly on the right shelf. Serial numbers travel with the goods.
Stocktaking one shelf at a time
When you create a stocktaking, choose not only the warehouse but also the Storage location (optional):
- the count sheet includes only products in that location and its nested locations;
- shortages are written off from that exact shelf;
- surpluses go onto the same shelf: if the product wasn't there, a new unit appears; if there was a batch without a serial number, the quantity is added to it. A surplus has an empty serial number; enter one in the details if needed.
Stocktaking for the whole warehouse works as before and doesn't assign anything to locations.
Employee access rights
An employee tied to a single warehouse (Access rights) sees only that warehouse and its locations, in both stock moves and stocktaking.
Where to start
- Don't map the whole warehouse at once; start with the area where products get lost most often.
- Don't make the tree too deep: "Rack → Shelf" is usually enough.
- Print tags right away: the real benefit comes from scanning, not from picking from a list.
- Assign your fast-moving products first, and you'll see the effect immediately.
Having some products assigned to locations and others not is perfectly fine. Addressable storage is one of the features of a warehouse CRM.